Niagara Webhooks
Product End of Life
Niagara Webhooks reaches end of life on June 1, 2023
As of June 1, 2023, this product will no longer be maintained; this includes new features, bug fixes, security updates, and Niagara 4 compatibility updates. Due to the upcoming end of life date, the product will no longer be available for purchase after January 1, 2023.
Frequently Asked Questions
Niagara Webhooks Removes Obstacles
Getting Niagara data to developers and third-party web services can be complex and insecure. It includes either exposing your station data publicly to the open internet or setting aberrant station security options and working with developers who understand Niagara. Systems with VPN requirements or behind inbound firewalls add additional layers of complexity and, in some cases, prevent sharing data all together.
With Niagara Webhooks your data is sent to third parties instead of them accessing it directly. This completely removes the need for login credentials on the station side and allows you to bypass any inbound firewall rules on the network.
Secure
Data is pushed out and never accessed by third parties until it hits their server. There is no need to provide access to your Niagara station to third parties.
Effortless
No need to create and manage special users and privileges in your station. Just drop in the Webhooks component, enter a URL, and select your points.
Circumvent Roadblocks
If your station is stuck behind a VPN or firewall, pushing data out may be the only way to get it to a third party.
Usage
Before following along, make sure that you download, install, and (optionally) license Niagara Webhooks.
- Open the Niagara Webhooks palette in Workbench and connect to your station.
-
Drag the
NiagaraWebhooksServicefrom the palette to yourConfig > Servicesfolder in your station nav tree -
Double-click on the
NiagaraWebhooksServicein yourConfig > Servicesfolder to open the property sheet. -
Set the
Server URLproperty to the URL you want to push your data to (this should be provided by a developer or the third-party service you're using).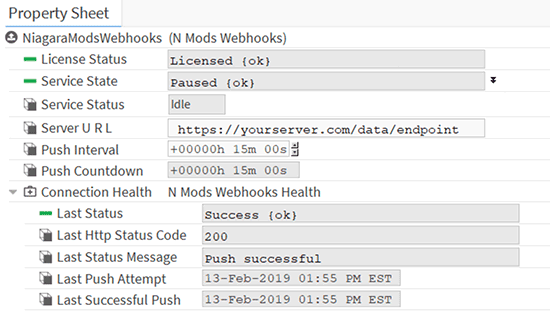
Drag the
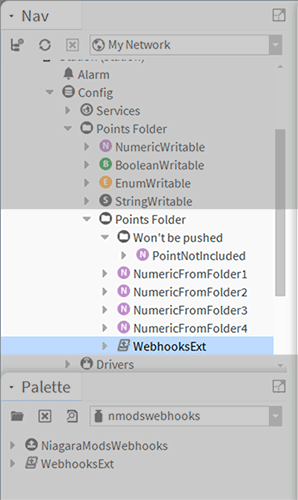
WebhooksExtfrom your palette to any point you wish to include in the data that is pushed. You can add theWebhooksExtto any control point or to any folder and Webhooks will automatically find all control points in that folder (but will not look in subfolders).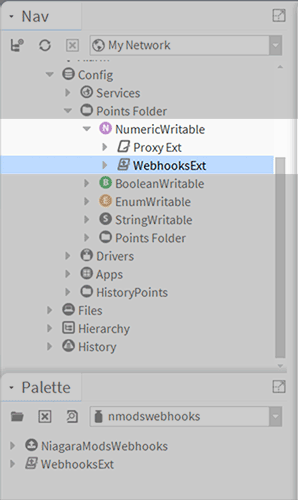
In the first example above,
WebhooksExthas been dragged on an individual point. This point will be included in the data that is sent on the next push.In the second example, a
WebhooksExthas been dragged on a folder that includes many points. All four points in the root of the folder will be sent on the next push. Note that the subfolder named "Won't be pushed" and its only point "PointNotIncluded" will not be pushed because theWebhooksExtonly looks for points in the root folder.- You can test your Webhooks data to see if it is pushing properly by right-clicking on the
NiagaraWebhooksServiceand going toActions > Push Datain the menu. You can expand theConnection Healthcomponent in the properties sheet to view the details of your last push, including if it was successful and any error messages that were returned. - Verify with your developer or on the third party service that they received the data as expected
- To push your data automatically at specific intervals, set the
Push Intervalproperty to the time value you wish to push. Then, set theService Statefrom "Paused" to "Active" and save your changes. You should now notice thePush Countdownproperty ticking down every second. -
If you do not want to push your data at a specific interval, leave the
Service Stateset to "Paused" and setup your custom logic to trigger thePush Dataaction on theNiagaraWebhooksServicewhen you want your data to be sent.
Example JSON
Below is an example of the JSON data pushed from Niagara Webhooks. It mirrors the point setup in Step #5 in the Usage section.
{
    "metadata": {
        "hostId": "Win-1234-5E7B-9A23-EFG1",
        "serviceVersion": "1.0.0",
        "niagaraVersion": "4.6.96.28.1"
    },
    "values": [
        {
            "name": "NumericWritable",
            "path": "/Points$20Folder/NumericWritable",
            "type": "number",
            "value": 200,
            "handle": "397d",
            "systemType": "control:NumericWritable"
        },
        {
            "name": "BooleanWritable",
            "path": "/Points$20Folder/BooleanWritable",
            "type": "boolean",
            "value": true,
            "handle": "39ee",
            "systemType": "control:BooleanWritable"
        },
        {
            "name": "EnumWritable",
            "path": "/Points$20Folder/EnumWritable",
            "type": "enum",
            "value": "anotherEnumTest",
            "handle": "39f0",
            "systemType": "control:EnumWritable"
        },
        {
            "name": "StringWritable",
            "path": "/Points$20Folder/StringWritable",
            "type": "string",
            "value": "testingStringWritable",
            "handle": "39f2",
            "systemType": "control:StringWritable"
        },
        {
            "name": "NumericFromFolder1",
            "path": "/Points$20Folder/Points$20Folder/NumericFromFolder1",
            "type": "number",
            "value": 0,
            "handle": "3a2f",
            "systemType": "control:NumericWritable"
        },
        {
            "name": "NumericFromFolder2",
            "path": "/Points$20Folder/Points$20Folder/NumericFromFolder2",
            "type": "number",
            "value": 0,
            "handle": "3a31",
            "systemType": "control:NumericWritable"
        },
        {
            "name": "NumericFromFolder3",
            "path": "/Points$20Folder/Points$20Folder/NumericFromFolder3",
            "type": "number",
            "value": 0,
            "handle": "3a71",
            "systemType": "control:NumericWritable"
        },
        {
            "name": "NumericFromFolder4",
            "path": "/Points$20Folder/Points$20Folder/NumericFromFolder4",
            "type": "number",
            "value": 0,
            "handle": "3a73",
            "systemType": "control:NumericWritable"
        }
    ]
}
Have a question? Find a bug?
You can connect with us via the chat bubble below or feel free to send us a detailed description of your problem and we’ll get back to you.