License Installation
Overview
After purchasing a license for a module, you can assign it to a Niagara Host ID. To assign licenses or change your license assignments sign in to your account and go to your Licenses page.
Reflow
The Reflow module has the License Service built in. You do not need to download and install the separate license service module. For instructions, visit the licensing section of the Reflow Documentation site or follow the steps below to refresh your license, replacing references to the LicenseService with the ReflowService.
Other NiagaraMods Products
For the module to work on your Niagara host, you must install our License Service. If your host is connected to the internet, the License Service will automatically communicate with our servers and download any product licenses assigned to your host's Host ID. You can also download and copy license files to your host manually.
Purchases from the Niagara Marketplace and VYKON
Modules purchased from the Niagara Marketplace or directly via VYKON use Tridium's Niagara licensing system. Licenses are assigned and downloaded via Niagara Central and are a part of your host's base Niagara license file.

Reflow Licensing
For in-depth instructions on Reflow licensing, please visit the Reflow product documentation website.

NiagaraMods License Service
This module is not required for Reflow. It is required for Niagara Webhooks and Tableau Web Data Connector
Download & Install the NiagaraMods License Service
The License Service is not required for Reflow, but is required for our modules including WebHooks and Tableau Web Data Connector to function – even in free trial mode. Follow the instructions below to download and install the License Service on your station.
- Download the NiagaraMods License Service
-
Open the downloaded file and copy the
nmodslicense-rt.jarfile to your Niagara modules directory. If you're not sure where your modules directory is, it can typically found atC:\Niagara\Niagara-4.x.x\modules - If Workbench is already open, close it and then relaunch it
-
Install the
nmodslicense-rt.jarmodule on to your station and restart it -
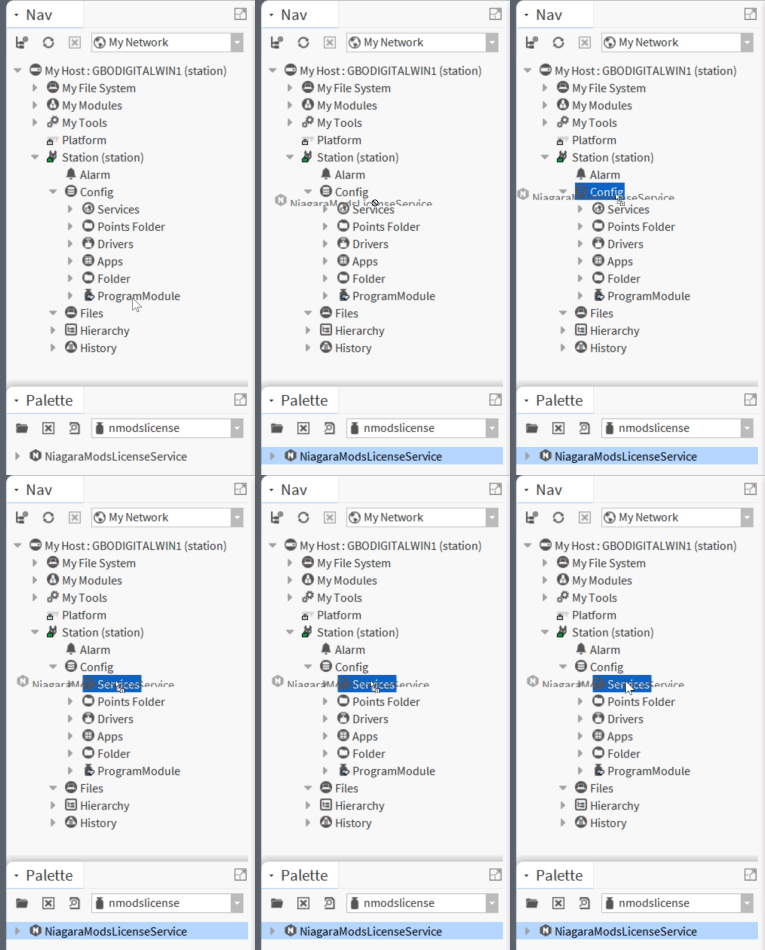
Connect to your station in Workbench and open the
nmodslicensepalette -
Drag the
NiagaraModsLicenseServicecomponent from the palette to your station'sServicesfolder, underConfig -
Don't forget to save your station by right-clicking on the station and
going to
Save

Automatic License Updates
As soon as you've installed the NiagaraMods License Service on to your station, it will attempt to connect with our servers and download your Host ID's license file. This single file contains all of the products that you have assigned to the host on the Licenses page.
Host ID license files expire one year after they are generated so its important to ensure that they are refreshed regularly. Thankfully, the License Service will attempt to connect with our servers once every 24 hours to automatically refresh your Host's license file.
Force Refreshing the Host License File
If you have recently added or changed products on your Host, you may not want to wait for the next automatic license refresh. To manually force a refresh of the Host's license file, follow these instructions:
-
Navigate to the License Service in your station's component tree.
If you followed the installation instructions above, it will
be in the
Config/Servicesfolder -
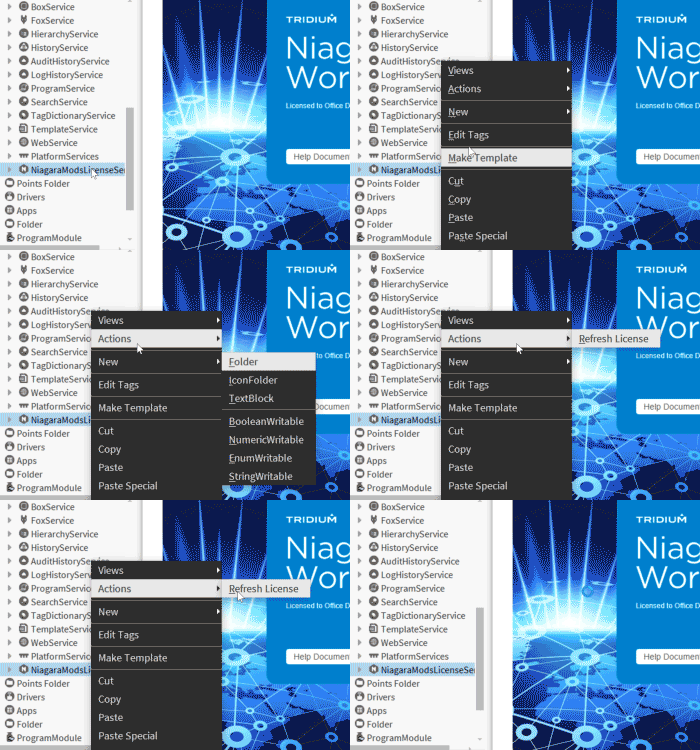
Right-click on the
NiagaraModsLicenseServicecomponent in the tree, go toActions, and clickRefresh License -
To confirm that the license has refreshed you can check the Application
Director logs in your platform. You will see a message
simliar to
[nmodslicense] NiagaraMods License Refreshedif things were successful or an error message if there was an issue communicating with our servers

Verifying your License File
The Host's license file is stored in the station file system and named
niagaramods.license.
-
You can verify that the license file has been downloaded by opening your station
in the nav tree and expanding the
Filestree. You should see a file namedniagaramods.license. -
You can open the
niagaramods.licensefile by double-clicking on it in the nav tree. The file is formatted in XML and viewing it will reveal its details including the date it was generated and any products that are included (as "features" in the XML). -
Editing the
niagaramods.licensefile will cause the license to be invalid and may cause your modules to crash. Never edit this file manually.
Manual License Installation
In cases where your station does not have internet connectivity including if a VPN or firewall is preventing your station from reaching out to the internet, you can install your Host's license file manually. To do this, follow the instructions below:
- Sign in to the NiagaraMods website and go to your Licenses page.
-
Click on the Host ID whose license you want to install in the list under
the
Host IDssection of the page. -
On the Host Details page, click on the
Niagara Licensetab in the middle of the page. This page will give you options to download or email theniagaramods.licensefile for the Host. Save this file in a location that you can access from Workbench -
In Workbench, navigate to where you saved your
niagaramods.licensefile in theMy File Systemnav tree. Right-click on theniagaramods.licensefile and go toCopy -
Connect to your station in Workbench. Open its nav tree and right-click on
Files, then click on Paste in the menu.
Manual Installation Notes
- You still need to have the License Service installed and running in your station for our modules to read and recognize the license file
- If you do not have internet connectivity on your station, you will need to repeat the manual installation each year before the license file expires
- If you do not have internet connectivity on your station, you will need to manually install a new license file after renewing or adding products
We're here to help
License installation throwing you for a loop?
We're standing by – just a click away.
